

How Can I Repair Water Filter Valve In Kitchen Sink
How to Replace a Shutoff Valve
Stop under-sink leaks with this 30-minute set.
![]() Time
Time
A total 24-hour interval
![]() Complexity
Complexity
Intermediate
![]() Price
Price
Less than $20
Introduction
You tin spend time rebuilding the old valve, but the problems will just reappear years from at present. The all-time way to bargain with bad valves is to supplant them with modern quarter-plow ball valves. They rarely lock up, leak or wear out and all-time of all, they'll take just an 60 minutes or so to install. Hither'southward how to put them in.
Tools Required
Materials Required
- Shutoff valve
Identify the valve connection style
A shutoff valve connects to copper plumbing pipes in one of ii ways:
- Compression plumbing fixtures
- Sweat fitting.
Place the connexion type used in your abode past referring to the photos below.
If you have an older home with galvanized pipes, nosotros suggest hiring a plumber to practice the switch out. Unscrewing the old valve and screwing on a new one may seem piece of cake enough. But if the pipage is rusted internally or the threads are rotted, this 'elementary' plumbing job tin plough into a plumbing nightmare. If your dwelling is plumbed with PEX or plastic piping, these instructions don't employ.
Once you lot place the connection type, buy a quarter-turn shutoff brawl valve to match the size of the incoming copper pipage and the size of the supply tube connection. If you're replacing a sweat valve, you'll need a torch, flux, solder, emery material, wire brushes and a flame protection cloth to shield the wall. This is also a skilful fourth dimension to supercede an one-time supply tube and a corroded escutcheon (wall trim plate). Lamentable to burst your chimera, but you need to stop believing these 10 plumbing myths ASAP!
Projection step-by-step (12)
Step 1
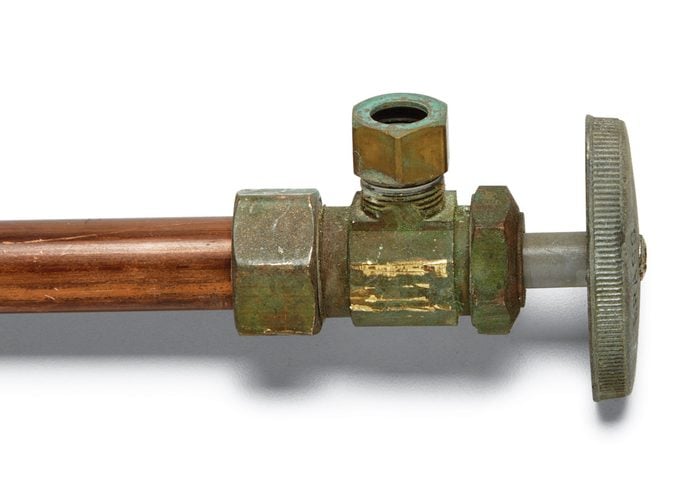
Sweat Valve:
A sweat shutoff valve doesn't have whatever hex flats where the copper tubing enters from the wall. Replace a sweat valve with another sweat valve or a compression valve.
Step two
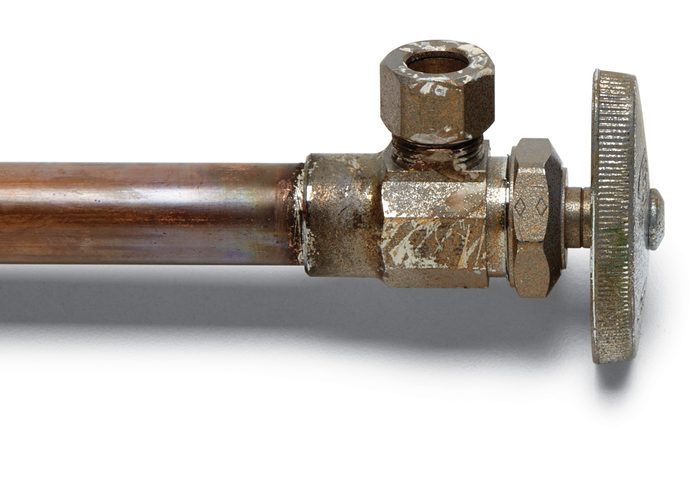
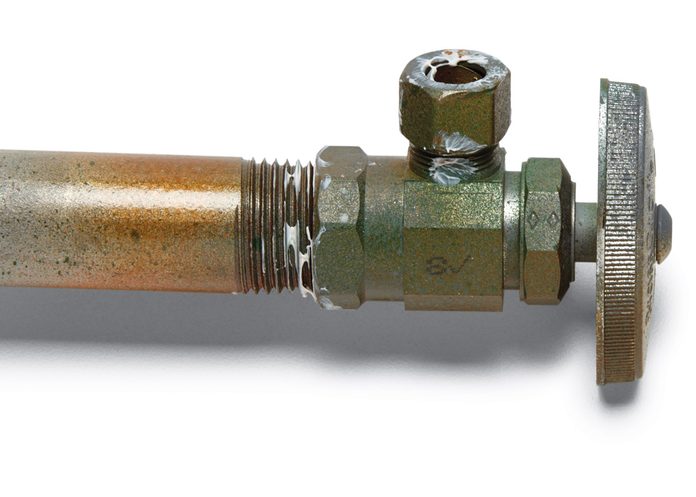
Compression Valve:
Examine the portion of the valve closest to the wall. Look for a hexagonal pinch nut and matching hex flats on the body of the valve next to the compression nut. If the valve has a pinch nut only no hex flats, look for two flats on the sides of the valve trunk.
![]()
Pace three
Threaded Valve:
Look for threads and hex flats where the steel pipe enters the valve.
Pace 4
Gear up for valve replacement
Close off the water at the main shutoff valve. If you take a gas h2o heater, turn the knob to the 'pilot' position. Shut off the circuit breakers to an electric water heater. And so open a faucet on the lowest level of your business firm and another faucet on an upper level to drain the pipes. Then disconnect the supply tube from the shutoff valve. Replace the valve.
Step 5
Later on replacement
Close the new valve. Then open the water-main shutoff valve and let the water run until all the air is out of the pipes. Then close off the upper and lower faucets. Check the new valves for leaks. Turn the water heater gas valve back to 'on' or flip on the circuit breakers to the electric water heater.
Step 6
Remove onetime sweat valve
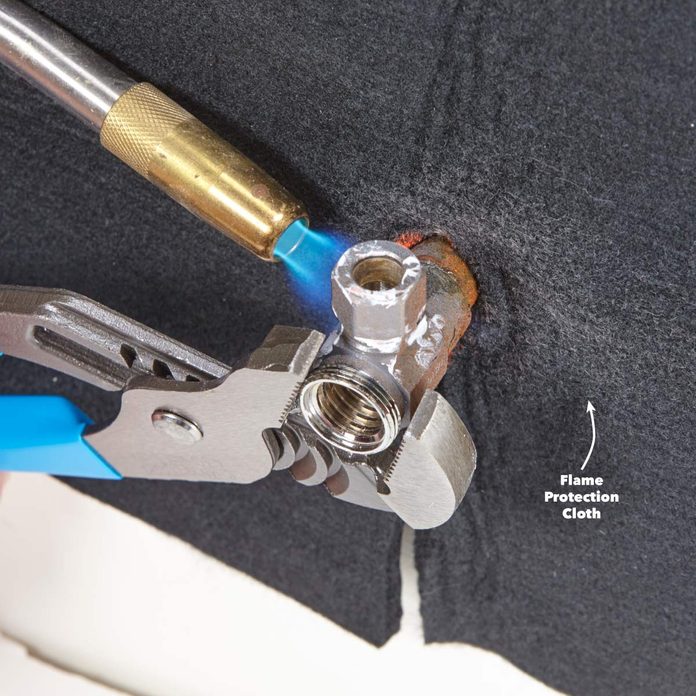
Concord the valve with a pliers, loosen the packing nut and unscrew the entire valve stem. Peek inside and remove the erstwhile washer if it's stuck on the seat. Removing the valve stem allows any remaining water to drain out, making the unsweating process easier. Earlier you lot do any torch work, brand certain at that place'southward a burn down extinguisher nearby and safeguard the wall with a flame protection cloth. Then remove the sometime valve and the remaining solder.
To begin, drape the flame protection cloth over the copper tubing and record it to the wall. Adjust the torch to a small-scale fame and aim it toward the body of the valve. Equally soon as the solder melts, twist and pull the valve off the copper tubing with a pliers.
Step 7
Clean backlog solder
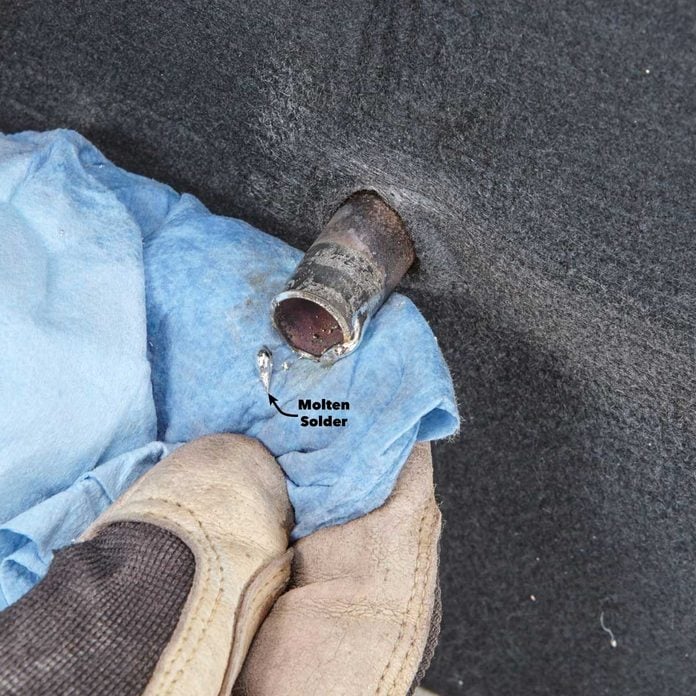
Clean the tubing with emery cloth. If you're replacing a sweat valve with a compression valve, sand off all traces of solder before adding the new escutcheon, nut and sleeve. Otherwise, remove enough quondam solder to allow the new sweat valve to slide onto the tubing. Remove the stalk and wire-brush the opening in the new quarter-turn valve and utilise flux to the valve and the copper tubing.
Put on a leather glove and take hold of a damp cotton rag (microfiber cloth will melt). With the flame protection cloth in place, estrus the valve just enough to draw in the solder. Heat the remaining solder with the torch until information technology'south molten. Every bit before long as the solder melts, wipe away the backlog solder with a damp rag. Be sure to clothing leather gloves to prevent steam burns.
Step 8
Remove and replace a compression shutoff valve
To remove a compression-style valve, hold the valve body with an adjustable or open-end wrench, or a slip-articulation pliers. Grab the compression nut with another wrench and turn it clockwise to loosen it. Then pull the valve off the copper tubing.
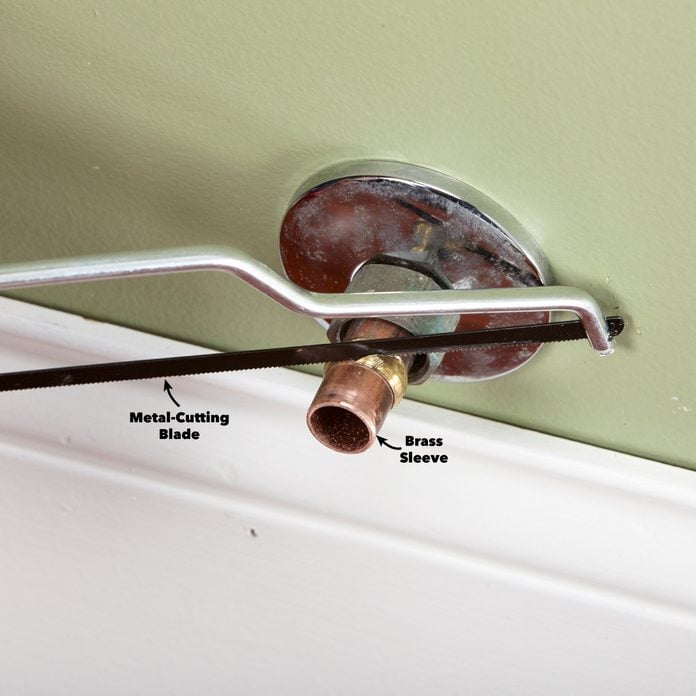
Adjacent, remove the old compression sleeve and nut. Take hold of the old sleeve with a pliers, using minimal pressure to avoid distorting the copper tubing. Then rotate and pull information technology off the tubing. If the sleeve is stuck, saw information technology and suspension it.
To saw it off, use a hacksaw to cut partially through the sleeve at an angle. Use short strokes to avoid cut into the copper tubing. Check your progress and stop cutting earlier you reach the copper.
Step 9
Twist and pause the sleeve
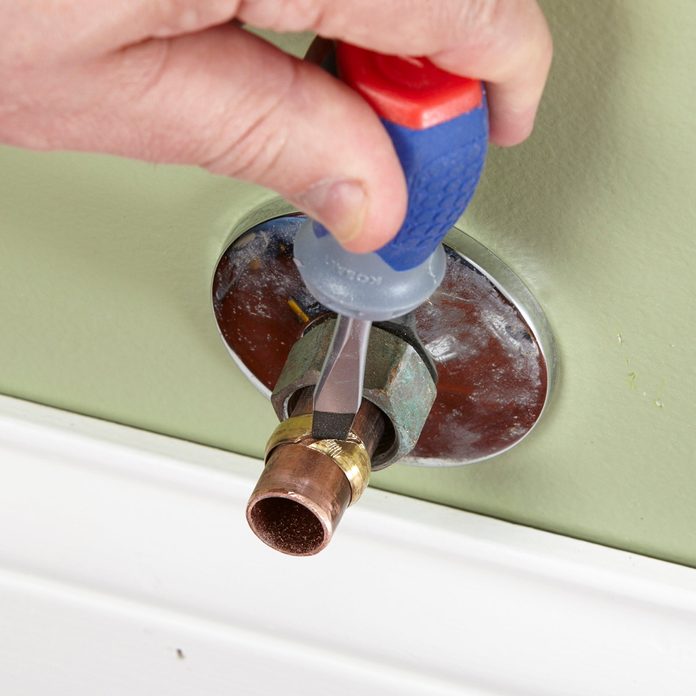
Insert a flat-blade screwdriver into the cut and twist the screwdriver to break the sleeve. Slide off the old sleeve, one-time compression nut and the escutcheon (if you're going to replace information technology).
Pace 10
Position the new pinch sleeve
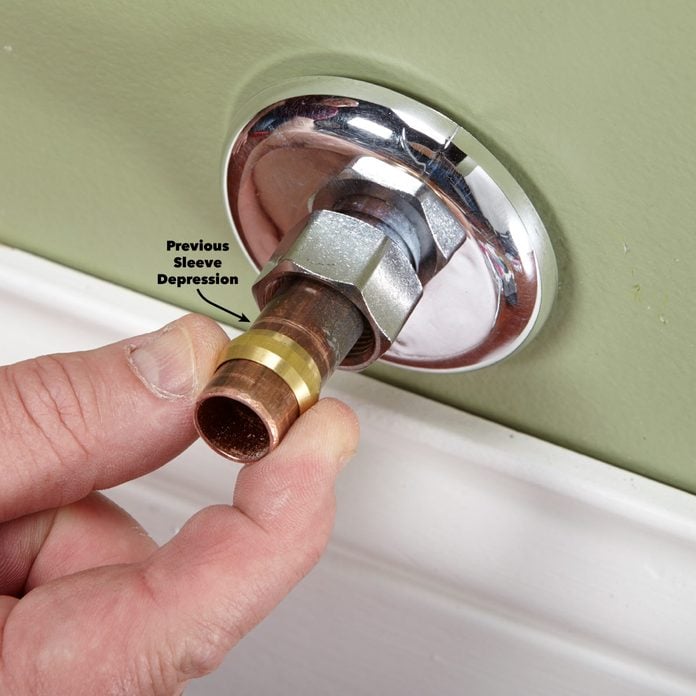
Slide the new escutcheon and compression nut onto the copper tubing. Then, slide the new pinch sleeve onto the copper tubing. If the old sleeve left depression marks, locate the new sleeve slightly forrad of the marks.
Step 11
New Compression Valve
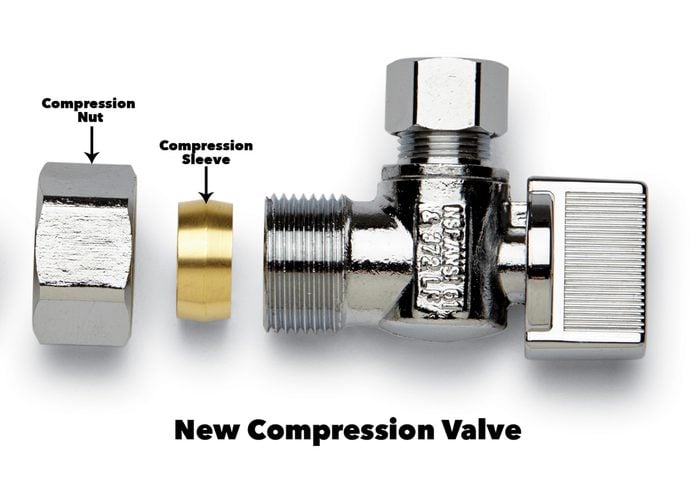
Insert the new valve and utilise a very light coating of pipe dope to the pinch sleeve. Next, spiral the compression nut onto the valve until snug. Hold the valve with a wrench or a pliers and tighten the nut a one-half to iii-quarters turn (follow the manufacturer's tightening instructions). Connect the supply tube and test for leaks.
Step 12
Can yous use a push-fit valve?
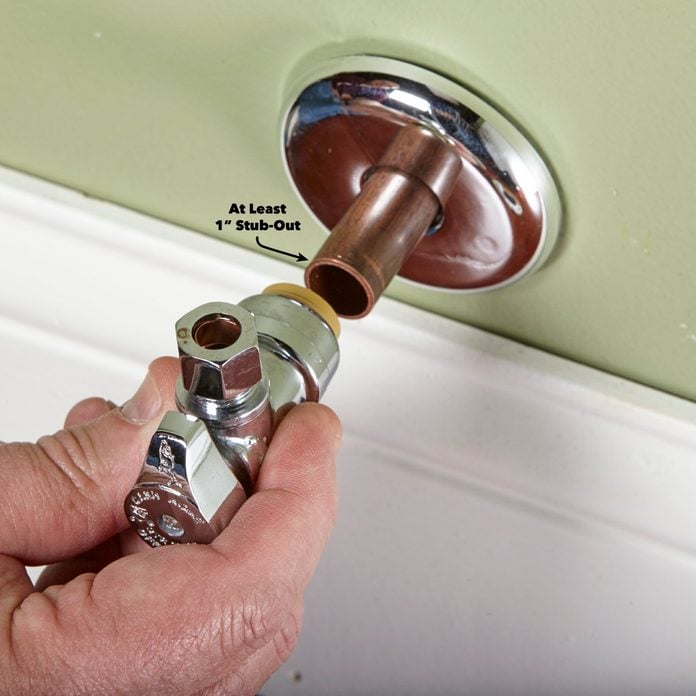
Several companies make quarter-turn push button-fit ball-way shutoff valves that install without tools. They're a good culling to sweat and pinch fittings if you lot have enough tubing projecting out from the wall and if that tubing is in skillful shape. They brand the chore fifty-fifty simpler. If your stub-out tubing is perfectly symmetrical, long enough and has a square-cutting stop, you might be able to use a button-fit valve to supersede your onetime compression or sweat valve.
Most button-fit valves crave at to the lowest degree ane in. of stub-out tubing. So measure the length of the stub-out and refer to the valve manufacturer'south length requirements before buying. If your tubing will piece of work, shop for a valve that meets your configuration needs (straight or angled). Button-fit valves are bachelor with and without a permanently mounted supply tube. We don't recommend the permanently installed supply tube version because you have to shut off the water and replace the unabridged unit if the supply tube ever needs replacement.
Earlier installing a push-fit valve, remove any burrs from the open up terminate. If y'all're replacing a sweat valve, remove all traces of solder and ensure the tubing is perfectly round. Then mark the installed length on the tubing and push the valve onto the tubing until information technology reaches the marking. Next time you lot have a drip, clog or leak, don't shell out large bucks for a professional plumber. You lot tin can set up it yourself with these 28 tips for becoming a principal plumber!
Originally Published: November 28, 2022

How Can I Repair Water Filter Valve In Kitchen Sink,
Source: https://www.familyhandyman.com/project/how-to-replace-a-shutoff-valve/
Posted by: tayloraffhand1945.blogspot.com
0 Response to "How Can I Repair Water Filter Valve In Kitchen Sink"
Post a Comment